

What Are Unified Access Tokens for Tableau Cloud?
Table of Contents
- What Are Unified Access Tokens for Tableau Cloud?
- Why Choose UAT?
- Why Wouldn’t I Use UATs?
- Prepping Your Toolbelt
- Let’s Talk About JWTs
- Ready, Set, Blast Off! 🚀
- Install Required Python Libraries
- Pro Tip: Use Python dotenv
- Creating a Public/Private Key Pair with Python
- Generating a signed JWT w/ Python
- Log Into Cloud Manager REST API Using a PAT
- Create a UAT Configuration Using Key Files
- Create a UAT Configuration Using a JWKS URI
- Example JWKS Endpoint Setup
- Listing, Retrieving, Updating and Deleting UAT Configs
- Authentication to the Cloud Manager API with JWT + Our UAT Config
- Go Forth and Do The Things!
- Additional Resources
There’s a new player in town in the world of Tableau Cloud API Authentication (which I’ve written about in-depth before here)!
Unified Access Tokens (UATs) for Tableau represent a welcome step forward for enterprise customers, providing the ability to bring your crypto keys and rotate/revoke as needed. Additionally, the ability to generate tokens that can be used across multiple sites and tenants is a great way to eliminate multiple points of potential failure and simplify access management/scoping for engineering and automation.
The set-up/requirements may seem daunting for less technical users, but this article explains the process so you can begin realizing the benefits of additional security and flexibility. As always, I welcome all feedback, questions, etc. in the comments or on my socials!
In this post, I’ll walk you through the steps to set up/manage/use Unified Access Token configurations for the Tableau Cloud Manager and Tableau Cloud REST APIs.
Why Choose UAT?
Those working with larger, more complex, and/or highly-regulated Tableau Cloud sites and tenants will realize these benefits from using UATs:
- UATs simplify automation and access management for complex, highly-regulated environments
- Enterprise users can enhance security through key rotation and centralized “kill switch” capabilities.
Specific advantages over other authentication methods:
- As with Connected Apps + JWT (JSON Web Tokens), tokens can be scoped very granularly (e.g. for PoLP)
- However, UATs are created at the Cloud Manager level, meaning they can be scoped across multiple sites or even tenants
- You bring your own cryptography keys when creating the UAT configuration:
- You own/provide the public key, which means you can revoke it at any time
- You can rotate/change keys as desired and use Cloud Manager API calls to update/add UAT configurations seamlessly
- The JWTs you generate can be used for the Cloud Manager API, Tableau REST/Metadata API and tableauserverclient
- No more need to maintain multiple PATs or Connected App configurations across sites!
Why Wouldn’t I Use UATs?

Unified Access Tokens aren’t the best solution for those with a small, single-tenant/single-site or who are new to using the APIs. If this sounds more like your use case, I’d recommend starting with another authentication option.
The initial UAT set up will require some investment, but for any larger use cases, the reduction in ongoing administration and minimization of risk will be worth it.
Prepping Your Toolbelt
There are several prerequisites to care for before we can use the Cloud Manager API to create new UAT configurations and interact with existing ones, as well.
- You’ll need to be a Cloud Administrator, with access to Cloud Manager
- Interacting with the Cloud Manager API to create UATs requires a Personal Access Token (PAT) for Cloud Manager
- NOTE: You cannot use a PAT generated from your Tableau account settings; it must be generated in Cloud Manager (see video below)
- If you already know you plan to use a JWKS URI, you need a place to host your endpoint on the internet
- Feel free to steal/dissect/share any or all parts of this guide – I’d love to hear if you found it useful! 😁
- If you’re following along here, the following tools will be required or very helpful:
(Video: How to create a PAT for Cloud Manager)
Let’s Talk About JWTs
From jwt.io:
JSON Web Token (JWT) is an open standard (RFC 7519) that defines a compact and self-contained way for securely transmitting information between parties as a JSON object. This information can be verified and trusted because it is digitally signed. JWTs can be signed using a secret (with the HMAC algorithm) or a public/private key pair using RSA or ECDSA.
It’s already possible to use JWT Authentication when interacting with the Tableau Server/Cloud APIs using Connected Apps; however, you must provide Direct Trust (via a key/secret pair generated by Tableau) or utilize your IDP via OAuth. If you maintain multiple sites, you may need to create or update these apps/secrets multiple times.
Unified Access Tokens amplify these concepts by allowing us to define public and private keys, generate (or bring) our own JWTs against them, and finally authenticate to Cloud Manager and Tableau Cloud APIs. UATs can be scoped to multiple sites/tenants and can be revoked at any time via API calls. This helps minimize failure points and creates a ‘kill switch’ scenario that is important for many enterprise customers.
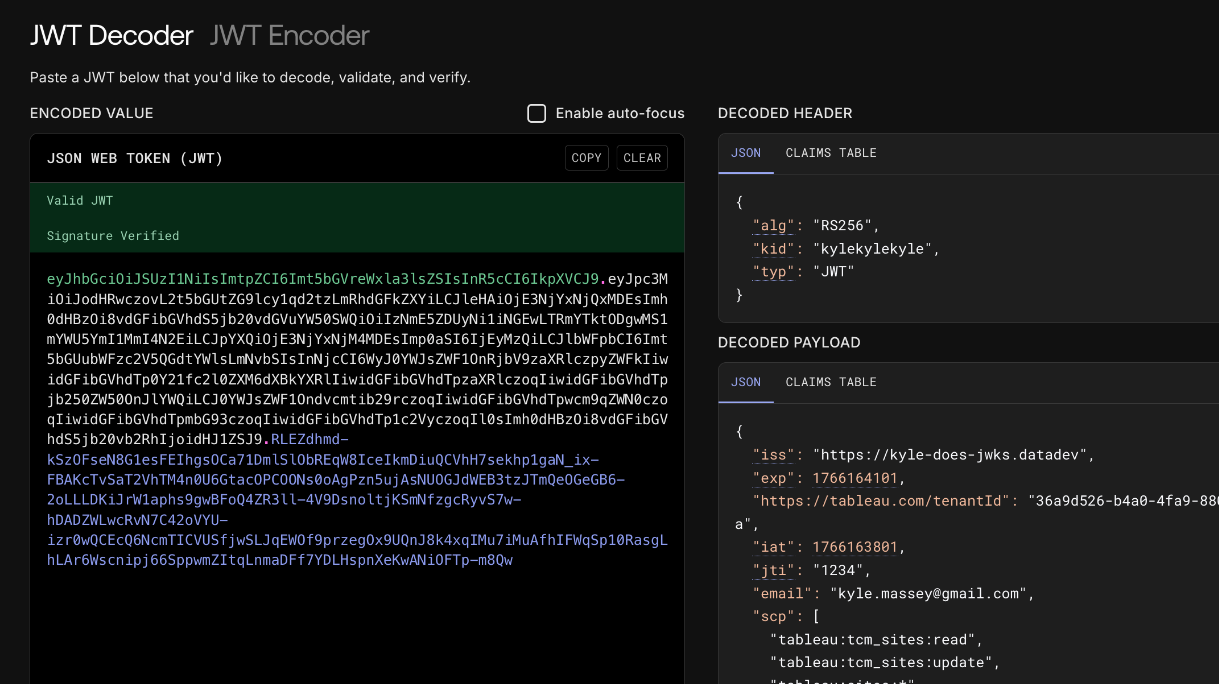
(Image: Example of a signed, decoded JWT and the info it contains)
Ready, Set, Blast Off! 🚀
We’re ready to dive into setting up and using our first UAT! Here are the basic steps we need to follow:
- Generate a public/private key pair (w/ Python)
- Generate JWTs using our keys (w/ Python)
- Log into the Cloud Manager API to:
- Create a UAT config
- List UAT configs
- Delete UAT configs
- Update UAT configs
- Log into Cloud Manager API w/ UAT
- Log into Tableau REST API w/ UAT
- Including tableauserverclient for Python
Don’t be intimidated! This might seem like a lot of steps, but I’ll provide examples for each – including a request library and code examples you can download for later use!
One last note: All code examples in this post will use Python; however, everything follows web standards/uses standard libraries that are available across many languages, like Java, JavaScript, etc. So, even if Python isn’t your thing, the concepts still apply!
Install Required Python Libraries
Before we dive in, be sure to create a Python virtual environment and then use pip to install these necessary requirements:
cryptography>=46.0.3
PyJWT>=2.10.1
python-dotenv>=1.2.1
requests>=2.32.5
tableauserverclient>=0.38
Alternatively, you can clone the GitHub repo below and run:
pip install -r requirements.txtYou likely don’t need to specify these exact versions when installing, but just be sure you’re not using older versions to avoid conflicts. Installing these packages will also install other dependencies they require.
Once everything has been installed to your venv successfully, save yourself some headache and setup your environment variables.
Pro Tip: Use Python dotenv
The examples you’ll see here (and in the linked GitHub repo) use the dotenv library for Python. This allows us to save important variables to a separate .env file so they can be referred to multiple places and maintained in only one. This also allows other users to use the same code without having to find/replace.
In the root of your project/folder, create a file .env (begins with a period). Copy/paste the lines below and update them with your details:
##################################
# Begin dotenv Settings
##################################

CLOUD_MANAGER_TENANT_ID = "YOUR-CLOUD-MANAGER-TENANT-ID"
CLOUD_MANAGER_PAT_NAME = "CLOUD-MANAGER-PAT-NAME"
CLOUD_MANAGER_PAT_SECRET = "CLOUD-MANAGER-PAT-SECRET"

CLOUD_MANAGER_PAT_LOGIN_URL = "https://cloudmanager.tableau.com/api/v1/pat/login"
CLOUD_MANAGER_JWT_LOGIN_URL = "https://{YOUR-TENANT-URI}.cloudmanager.tableau.com/api/v1/jwt/login"
CLOUD_MANAGER_UAT_CONFIGS_URL = "https://{YOUR-TENANT-URI}.cloudmanager.tableau.com/api/v1/uat-configurations"

TABLEAU_CLOUD_POD_URL = "https://{YOUR-TABLEAU-CLOUD-POD-URL}"
TABLEAU_CLOUD_SITE_ID = "YOUR-TABLEAU-SITE-ID"
TABLEAU_CLOUD_SITE_LUID = "YOUR-TABLEAU-SITE-LUID"

TABLEAU_CLOUD_USERNAME = "TABLEAU-CLOUD-USERNAME"Creating a Public/Private Key Pair with Python
The following is an example of how to create our private/public key files, public_key.pem and private_key.pem:
from cryptography.hazmat.primitives.asymmetric import rsa
from cryptography.hazmat.primitives import serialization
from cryptography.hazmat.backends import default_backend

# 1. Generate an RSA private key
private_key = rsa.generate_private_key(
   public_exponent=65537,
   key_size=2048,
   backend=default_backend()
)

# 2. Derive the public key from the private key
public_key = private_key.public_key()

# 3. Serialize the private key to PEM format (for secure storage and signing)
# This key should be kept secret and never exposed publicly.
private_pem = private_key.private_bytes(
   encoding=serialization.Encoding.PEM,
   format=serialization.PrivateFormat.PKCS8,
   encryption_algorithm=serialization.NoEncryption()
)

# 4. Serialize the public key to PEM format (for sharing and verification)
public_pem = public_key.public_bytes(
   encoding=serialization.Encoding.PEM,
   format=serialization.PublicFormat.SubjectPublicKeyInfo
)

# Print keys (for demonstration purposes - store securely in a real application)
print("--- Private Key (Keep Secret) ---")
print(private_pem.decode('utf-8'))
print("\n--- Public Key (Shareable) ---")
print(public_pem.decode('utf-8'))

with open('private_key.pem', 'wb') as f1, open('public_key.pem', 'wb') as f:
   f1.write(private_pem)
f.write(public_pem)Unless you have specific reasons not to, the above code can be used as-is for most users. Keep both files safe (we’ll need them again), but never, ever share your private key file!
Generating a signed JWT w/ Python
Now that we’ve established our cryptographic keys, we will use them when generating our JWT.
import jwt
import datetime
from dotenv import load_dotenv
import os

load_dotenv() # This loads the variables from our .env file

def get_jwt():
   with open("private_key.pem", "r") as key_file:
       secret_key = key_file.read()

   payload = {
       "iss": "https://kyledoes.datadev", # Add your issuer here
       "exp": datetime.datetime.utcnow() + datetime.timedelta(minutes=5),
       "https://tableau.com/tenantId": os.getenv("CLOUD_MANAGER_TENANT_ID"),
       "iat": datetime.datetime.utcnow(),
       "jti": "1234",
       "email": os.getenv("TABLEAU_CLOUD_USERNAME"),
       "scp": [
           "tableau:tcm_sites:read",
           "tableau:tcm_sites:update",
           "tableau:sites:*",
           "tableau:content:read",
           …additional scopes…,
           ]
   }

   headers = {
       "kid": "key-id-1", # Optional Key ID, use with jwksUri
       "typ": "JWT"
   }

   # Encode token
   token = jwt.encode(payload, key=secret_key, algorithm="RS256", headers=headers)

return tokenA deep-dive on JWTs is beyond the scope of this article, but here are a few callouts on the structure/claims above. Refer to the official Tableau Cloud Manager docs for more information.
| Key | Name | Description |
|---|---|---|
| iss | Issuer | Unique URI, including protocol (e.g. https://) – must match iss value in UAT config |
| exp | Expiration | Token expiration time in Epoch seconds, in this example time of generation + 5 minutes |
| https://tableau.com/tenantId | Cloud Manager Tenant ID | Tenant ID for Cloud Manager, must match value in UAT config |
| iat | Issued At Time | Token creation time in Epoch seconds |
| jti | JWT ID | Unique identifier for tokens generated, used for revoke capabilities. Must match value in UAT config |
| email* | Cloud Manager/Tableau Cloud User Email | The user’s email address registered with Cloud Manager/Tableau Cloud |
| scp | Scope | Defines level of access the token will grant. Cannot exceed level of access in UAT config More information:Scopes for Cloud ManagerScopes for Tableau Cloud |
| kid (in Headers) | Secret ID | Required when using JWKS |
| typ (in Headers) | Token type |
This isn’t an exhaustive list, refer to the official docs for all supported claims, including things like On-Demand Access, User Attributes, etc.
With our keys and JWT generation code in hand, we’re ready to log into the Cloud Manager REST API and create a UAT configuration!
Log Into Cloud Manager REST API Using a PAT
We need to authenticate with the Cloud Manager REST API before we make our requests. Luckily, this is very easy to do using the PAT we created earlier:
Using Python requests:
import requests
from generate_jwt import get_jwt
from dotenv import load_dotenv
import os

load_dotenv()


def sign_in_to_cloud_manager_rest_api_pat():
   url = os.getenv("CLOUD_MANAGER_PAT_LOGIN_URL")

   req_body = {"token": os.getenv("CLOUD_MANAGER_PAT_SECRET")}
   response = requests.post(url, json=req_body)

return response.json()Example response body:
{
   "sessionToken": "MPYG1UkHQBGzLX0meMAnLw==...",
   "userId": "b987200e…",
   "tenantId": "36a9d526-...",
   "sessionExpiration": "2026-06-15T14:04:40.189844552Z"
}Make note of the sessionToken, userId and tenantId values. You’ll use sessionToken in all subsequent requests as a header.
If you use the collection/environment for Postman (posted later in this article), these values will be updated automatically when you run Tableau Unified Access Tokens > Cloud Manager > Authentication > Log in w/ PAT.
We’re now ready to create our first UAT config!
Create a UAT Configuration Using Key Files
Using Python requests:
import requests
from dotenv import load_dotenv
import os

load_dotenv()

def create_cloud_manager_uat_config(session_token):
   url = os.getenv("CLOUD_MANAGER_UAT_CONFIGS_URL")

   with open("public_key.pem", "r") as key_file:
       public_key = key_file.read()

   req_body = {
       "name": "Your-UAT-Config-Name",
       "issuer": "https://your-jwt-issuer.value",
       "publicKey": public_key,
       "usernameClaim": "email",
       "resourceIds": [
           "36a9d526…",  # Cloud Manager Tenant ID
           "e7cc4b0b…",  # Tableau Cloud Site ID
       ],
       "scopes": [
           "tableau:tcm_sites:read",
           "tableau:tcm_sites:update",
           "tableau:sites:read",
           "tableau:content:read",
           …additional scopes…,
       ],
       "enabled": True,
   }

   headers = {"x-tableau-session-token": session_token, "Content-Type": "application/json"}

   response = requests.post(url, json=req_body, headers=headers)

return response.json()Example response body:
{
   "id": "UatConfigurationId{tenantId=36a9d526…, configId=d06c826a…}",
   "tenantId": "36a9d526…",
   "configId": "d06c826a…",
   "name": "Your-UAT-Config-Name",
   "issuer": "https://your-jwt-issuer.value",
   "publicKeyActive": "-----BEGIN PUBLIC KEY-----…-----END PUBLIC KEY-----",
   "publicKey": null,
   "jwksUri": null,
   "usernameClaim": "email",
   "resourceIds": [
       "36a9d526…",
       "e7cc4b0b…"
   ],
   "scopes": [
       "tableau:tcm_sites:read",
       "tableau:content:read",
       "tableau:sites:read",
       "tableau:tcm_sites:update"
   ],
   "enabled": true
}It’s important to ensure that values for issuer, public key, resource IDs, scopes, etc. are correct and match between the configuration you just created and the JWTs we’ll generate later. We will receive errors if there are mismatches or conflicts.
Create a UAT Configuration Using a JWKS URI
Instead of providing the contents of your public_key.pem file directly, you can use a JSON Web Key Set(JWKS) URI where the key information can be retrieved via the internet.
This approach may be preferred by many enterprise users because it allows you to rotate or revoke/invalidate keys universally. Many corporate IDPs provide these JWKS endpoints already – refer to your internal documentation for specifics.
Using Python requests:
import requests
from dotenv import load_dotenv
import os

load_dotenv()

def create_cloud_manager_uat_config_jwks(token):
   url = os.getenv("CLOUD_MANAGER_UAT_CONFIGS_URL")

   req_body = {
       "name": "Your-UAT-Config-Name",
       "issuer": "https://your-jwt-issuer.value",
       "jwksUri": "https://{{YOUR API ENDPOINT}}/.well-known/jwks.json", # // USE EITHER publicKey OR jwksUri
       "usernameClaim": "email",
       "resourceIds": [
           "36a9d526…",  # Cloud Manager Tenant ID
           "e7cc4b0b…",  # Tableau Cloud Site ID
       ],
       "scopes": [
           "tableau:tcm_sites:read",
           "tableau:tcm_sites:update",
           "tableau:sites:read",
           "tableau:content:read",
           …additional scopes…
       ],
       "enabled": True,
   }

   headers = {"x-tableau-session-token": token, "Content-Type": "application/json"}

   response = requests.post(url, json=req_body, headers=headers)

return response.json()NOTE: When using a JWKS URI, you must configure your endpoint with the same “kid” value that appears in the headers of the JWTs you generate (see above section)
Example JWKS Endpoint Setup
You can skip this if you don’t plan to use JWKS 😉
Here’s an example of a very basic Express app that can serve a JWKS endpoints:
First, ensure you have node.js installed, then run npm install for the following modules:
- express
- jose
- node-jose
const express = require('express');
const fs = require('fs');
const { importSPKI, exportJWK } = require('jose');

const app = express();

// Use the PORT environment variable provided by Heroku, or default to a local port (e.g., 3000)
const PORT = process.env.PORT || 3000;

// 1. Load the public key from a PEM file
// (Assuming you have a 'public_key.pem' file in the root directory)
const publicKeyPem = fs.readFileSync('./public_key.pem', 'utf8');

let publicJwk;

async function initializeKey() {
 try {
   // 2. Convert the PEM (SPKI format) to a KeyLike object, then to JWK format
   const keyLike = await importSPKI(publicKeyPem, 'RS256'); // Specify the algorithm (e.g., 'RS256')
   publicJwk = await exportJWK(keyLike);

   // Optional: Add a Key ID (kid) to help clients select the correct key
   publicJwk.kid = 'YOUR-UNIQUE-KEY-ID';
   console.log('Public key converted to JWK format successfully.');

 } catch (error) {
   console.error('Failed to process key:', error);
   process.exit(1); // Exit if the key cannot be loaded
 }
}

// 3. Create the JWKS endpoint
app.get('/.well-known/jwks.json', (req, res) => {
 if (!publicJwk) {
   return res.status(503).send('Key not available yet');
 }
 // The response should be a JSON object with a 'keys' array
 res.json({
   keys: [publicJwk],
 });
});

// Start the server after initializing the key
initializeKey().then(() => {
 app.listen(PORT, () => {
   console.log(`JWKS endpoint listening at .../.well-known/jwks.json on port ${PORT}`);
 });
});Run this app with the command:
node app.jsOnce running locally, visit http://localhost:3000/.well-known/jwks.json, and you should see something like this:
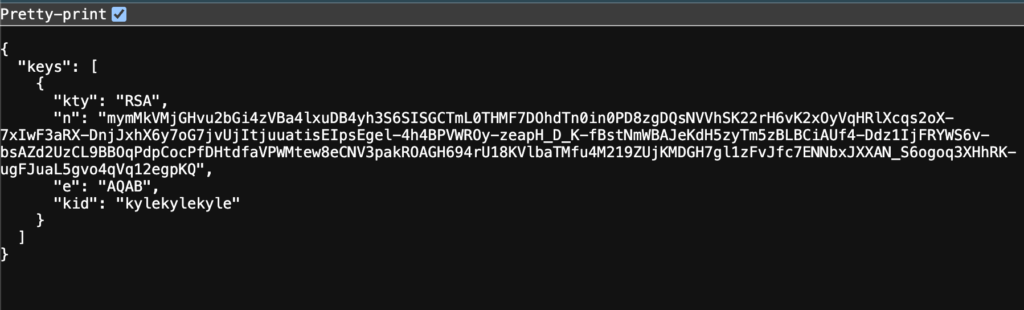
When using a UAT config with a JWKS URI, Cloud Manager/Tableau Cloud will retrieve this data from your endpoint and use it to validate the signature of your JWT. This means that if you intend to host your own JWKS URI endpoint, it must be available from the internet!
For more details on deploying this example app, e.g. to Heroku, see the link to the GitHub repo later in this article.
Listing, Retrieving, Updating and Deleting UAT Configs
Naturally, we’ll want a way to get information about existing configs, update them or delete them. We’ll use the same URL for these operations, as well:
URL: https://your-cloud-manager-tenant-uri.cloudmanager.tableau.com/api/v1/uat-configurations
| Action | HTTP Method | Endpoint | Request Body | Comment |
|---|---|---|---|---|
| List UAT Configs | GET | / | NONE | |
| Retrieve UAT Config | GET | /{configId} | NONE | |
| Delete UAT Config | DELETE | /{configId} | NONE | |
| Update UAT Config | PUT | /{configId} | Same as Create, with desired changes | Include all values from Create, even if unchanged |
Authentication to the Cloud Manager API with JWT + Our UAT Config
We now have everything we need to utilize our Unified Access Token configuration to authenticate with the Cloud Manager REST API and the Tableau Cloud API!
Cloud Manager Log-In w/ JWT:
from generate_jwt import get_jwt
from dotenv import load_dotenv
import os

load_dotenv()

def sign_in_to_cloud_manager_rest_api_jwt():
   url = os.getenv("CLOUD_MANAGER_JWT_LOGIN_URL")

   req_body = {"token": get_jwt()}

   response = requests.post(url, json=req_body)

   print("JWT Sign-In Response Status Code:", response.status_code)
return response.json()Response:
{
   "sessionToken": "UqoW1NQiRO2cSjsmh8kR1Q...",
   "userId": "b987200e…",
   "tenantId": "36a9d526…",
   "sessionExpiration": "2025-12-19T21:20:11.035645052Z"
}You are now authenticated with the Cloud Manager REST API, note/store the sessionToken in the response and use it as the x-tableau-session-token header for subsequent requests, just as you normally would.
Tableau Cloud REST API Log-in w/JWT:
import os
from dotenv import load_dotenv
import requests
from generate_jwt import get_jwt

load_dotenv()

def login_to_tableau_cloud_with_uat():
   url = f"{os.getenv('TABLEAU_CLOUD_POD_URL')}/api/3.27/auth/signin"

   body = {
       "credentials": {
           "jwt": get_jwt(),
           "isUat": True,
           "site": {
               "contentUrl": os.getenv("TABLEAU_CLOUD_SITE_ID")
           }
       }
   }

   response = requests.post(url, json=body, headers={"Content-Type": "application/json", "Accept": "application/json"})

return response.json()Response:
{
    "credentials": {
        "site": {
            "id": "e7cc4b0b…",
            "contentUrl": "kjmassey"
        },
        "user": {
            "id": "b11a0e89…"
        },
        "token": "sSOpQnGWS4aCQ-..."
    }
}You’re ready to roll with the Tableau Cloud REST API now, too!
For subsequent requests, use the credentials > token value as the x-tableau-auth header.
Logging in with tableauserverclient:
NOTE: Support for UATs in tableauserverclient has been added to the official code repository, but has not been officially released as of December 19, 2025. I’ll remove this note once it’s GA.
from generate_jwt import get_jwt
import os
import tableauserverclient as TSC
from dotenv import load_dotenv

load_dotenv()

def tableau_server_client_sign_in_with_uat():
   # NEED PR FOR TSC TO SUPPORT isUat PARAMETER

   jwt_token = get_jwt()
   tableau_auth = TSC.JWTAuth(jwt_token, site_id=os.getenv("TABLEAU_CLOUD_SITE_ID"), isUat=True)
   server = TSC.Server(os.getenv("TABLEAU_CLOUD_POD_URL"), use_server_version=True)

   with server.auth.sign_in(tableau_auth):
       print("Signed in to Tableau Cloud using TSC with UAT.")
return server.auth_tokenOutput:
Signed in to Tableau Cloud using TSC with UAT.
21XDgRYARE2H7AvszvlXAg...With TSC, you can continue to use the with server.auth.signin… context manager the same way you always have. The example above shows that the sign-in request was successful, and an access token was issued. The library will handle including it as the necessary header when needed.
Go Forth and Do The Things!
If you’ve made it this far, you’re ready to use the Cloud Manager and Tableau Cloud REST APIs normally. 🤘🏻
Authenticating using our UAT config + JWT has given us a session/access token, which we’ll use in all future requests – nothing about how we interact with the API endpoints changes!
Additional Resources
These files/repos may be helpful for future reference:
If you found any part of this article useful, I’d love to hear from you! How did Unified Access Tokens for Tableau Cloud/Cloud Manager make your life as an admin easier? 😁